CNC Machine Horizontal Work Piece Clamping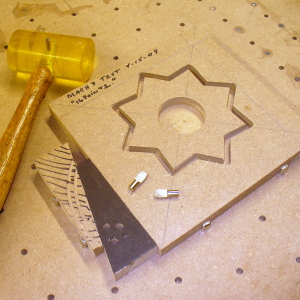
This technique comes from one of the users of this site (Robert L). He has come up with a brilliant clamping idea. I get many emails asking, "how do you clamp your workpiece." I would often reply with the screw and wood scrap idea, but when I saw the method below, I knew this was the one to seriously consider. The historic reference is icing on the cake. When he talks about the moving to various positions, he is making reference to g-code. He specifies, assuming that you have zeroed out the correct position of the origin, that you move to x0 y0... and so on. You would type the g-code: g0 x0 y0 - this g-code moves the bit to the (0,0) position on an x,y coordinate system. You would then want to move the bit downward to create the hole. Depending on your z-axis zero position, say the top of the workpiece is at 0, you would use the g-code: g1 z-0.5 and them immediately g0 z.5 which brings up the bit 1/2" above the work piece. Carry on to the next position of 2" from the x origin by typing: g0 x2. Y is omitted from this since you want y to remain at 0. You get the idea... Now read on and enjoy the simple and effective technique.
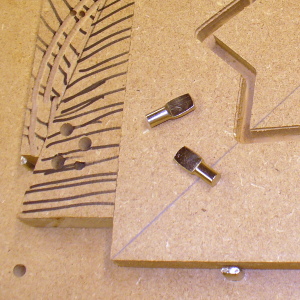
My fixturing solution is to drill a pattern of 1/4" holes in the MDF table. Write your own g-code without a drawing for this simple process and use the router to drill into its own table. I put the holes 2" apart and staggered the rows of holes. ie first row: X0 Y0, X2, X4, X6 etc then: X1 Y2, X3, X5 and so on. Drill each hole 1/2" deep. Now go buy 1/4" shelf support pins for cabinets and storage systems at Home Depot or Lowes. Get the ones with one flat end. They are available in plated steel and in plastic if there is concern about hitting one with the router bit. The flat side is on the centerline of the pin and when driven into the table holes the center line of the holes becomes the fixture edge. Put two pins on each of two adjacent sides of the rectangular workpiece. Make two long narrow wedges out of MDF. Put another shelf pin on a third side of your workpiece, leaving room for the two wedges between that pin and the workpiece. Tap the two wedges towards each other and they firmly lock the workpiece in place. The fourth side can be wedged, also, but I haven't found that to be necessary. The pins need to be tapped in with a plastic, wooden or steel hammer using gentle taps and bottoming out in the hole. I use a pair of pliers to pull the pins out of the holes. My workpieces do not shift or move when locked in this way.
Driven wedges is an ancient locking method and is still used today in many applications. Wedges were used to lock the dies in the giant forging presses in the shop i once worked in. It would also be possible to drill 5/8" or 1/2" holes in the table, fill them with epoxy resin, redrill at 3/8" or 1/4" and tap threads into the epoxy for bolted hold-down clamps.