Getting rid of backlash seems to be the biggest concern for the CNC hobbyist, especially when milling PCBs since copper traces for surface mount devices are used. Surface mount devices are very small electronic parts that contain leads that are extremely close together, or the leads are found on the bottom of the component and the part usually lays flat on the PCB (Printed Circuit Board).
Gérard C. has an interesting technique in solving this problem using two special nuts, one on either side of the MDF, to minimize the backlash (and is adjustable). I've said the word a few times, but you are saying to yourself, what is backlash? Backlash isn't the character located above your enter button, that's the back-slash, nor is it the post experience from a fight with your wife. Backlash is caused by the space between the threads of a screw, and the threads in the nut. If space exists where the two mate, then there will be a loss of movement in the linear motion when the screw is turned, or worse, vibration can transmit through this space make for undesirable accuracy or precision in the cut. Software can eliminate backlash for the short term, but calibration in needed constantly. Totally eliminating the space in the mating of the screw and nut can also cause binding problems, so it is a good idea to lubricate the screw and nuts before use, or use ballscrews.
From Gérard C: Backlash occurs when the screw changes direction of rotation because the driving strength is reversed and then applied to the opposite wall of the threading. Interchangeability and machining allowances make compulsory a functional gap between nut threading and screw threading, so it exist a dead time while nut is not driven when screw rotation has just reversed because rubbing against the opposite wall is not immediate and screw must turn some degrees before it occurs.
Principle :
Backlash is lowered if functional gap is reduced, a simple way to do this is to use two opposing nuts, one is permanently rubbing against the left wall of threading while the other rubs against the right one. Opposing nuts are here threaded inserts for hard wood, they are both screwed inside the same hole bored through a MDF part. First insert is locked while second is firmly held in the opposite hole entry, it can nevertheless be rotated for adjusting.
Boring and screwing inserts :
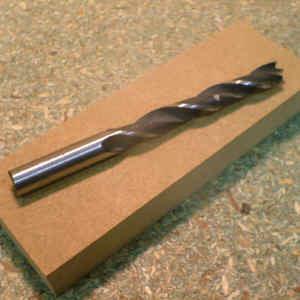
Pay attention with the MDF part thickness, it must be at least twice the insert nut height. If not, glue together two MDF boards for obtaining the necessary thickness. Use of a drilling machine mounted on its stand is mandatory for boring perpendicularly to MDF surface. Use three points wood drill.
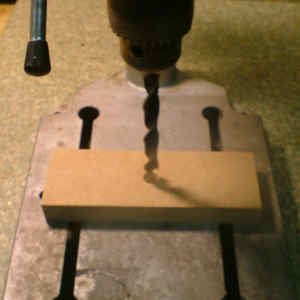
Don't drill hole completely, stop drilling when center point of drill appears on opposite side.
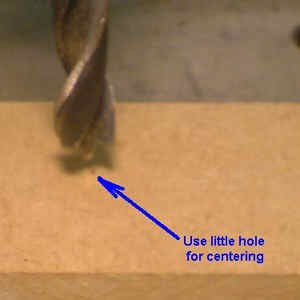
Then return MDF part upside down and use the little hole to center drill before drilling the other entry of the the hole.
Inserts must be screwed perpendicularly regarding the surface of the piece of MDF to avoid misalignments.
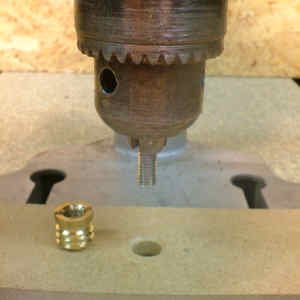
Here is a method to do this easily, your drilling machine is going to be used as a hand screw-driver (this method is also available for holding a tapping tool if you want to tap holes.) - Unplug the power supply from the drilling machine, it's for safety.
- Tighten a small stick of threaded rod in the chuck of the drilling machine (replace the stick with a tapping tool if you want to tap holes)
- Screw the insert onto this stick.
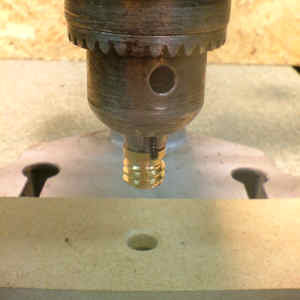
- Place the MDF part on the stand plate, hole just below insert.
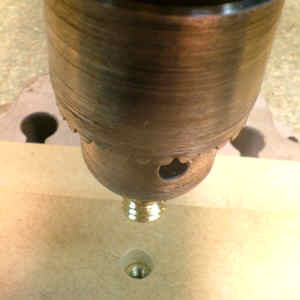
- Press the stand lever for moving down the insert until it enter the hole, Move the MDF part to center the insert when it's very ready to enter the hole.
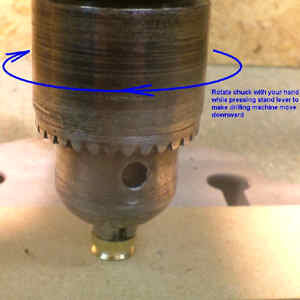
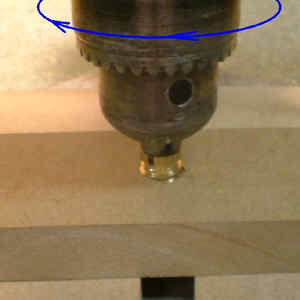
- Use one hand to turn the chuck while continuing to press the stand lever, Pay attention, the MDF part must not turn when screwing the insert inside.
- Return MDF part upside down.
- Repeat the same process on the other face of the MDF part with the second insert. First insert flange may be cumbersome, so place a wooden spacer between MDF part and stand plate for a correct laying.

Nuts adjusting :
The two nuts must be fully screwed inside the MDF. Introduce the screw in the first insert, continue turning the screw until it is stopped, unscrew gently the second insert until the screw accepts to turn almost freely . Ordinary threaded rods are not perfectly accurate so it's important to check this adjustment over the entire length of the screw. It must not exist any hard point., if so, screw/unscrew the second insert to readjust free rotation and re-check again.
Remember : lower backlash is a compromise between hindered and free rotation of the screw on its entire length.